US QWERTY+
How to Install the Keyboard Layout
(Windows only)
The keyboard layout is made available as a Microsoft Setup (.exe) compressed in a ZIP folder.
The keyboard layout must be installed on each Windows computer on which it is to be used. Perform the following steps from an account with the Administrator privilege. Screenshots are of Windows 10 Home Version 1809.
Click the download buttons below
Latest version : US QWERTY+ v3.44
Selecting “Download via Google Drive” also allows you to download older versions
To see the changelog click this Google Docs document ↗
Note: the screenshots below may show an outdated version of the keyboard layout. The download folder has the updated diagrams.
✽ 1. In Windows Explorer, right click on the downloaded ZIP file and select “Properties” (at the very bottom). Then tick the checkbox “Unblock” to unblock the ZIP file.


✽ 2. Right click again on the ZIP file and select “Extract All…”. This will extract the contents to a new directory. Then choose to display the contents of the new directory.

✽ 3. Inside the now-extracted zip file are four folders:
×××usq+a
×××usq+b
×××usq+s
×××usq+t
These are the four versions of the same keyboard layout and are basically identical.
Type A
The first version is called Type A and is considered the default recommended version because I think it’s the best version for most people. In this layout the (`) key becomes a grave accent dead key on the first level to make it very easy to type (à è ì ò ù). With Type A, à is easier to type but (`) on its own may be more difficult to access.
(`) can be typed as a normal non-dead key in the following ways:
-
press ` then press SPACE to get `
-
press ` then press ` again to get a single `
-
hold down ALTGR and then press ` to get a single `
Type B
If that is still impractical, there’s US QWERTY+ Type B, which is good for users who use the backquote (`) in programming very frequently. This layout the most similar to the standard US QWERTY layout.
Type S
This version is similar to Type A, but it breaks the “no-drastic-changes-to-the keyboard” rule quite a bit as this is the version that adds non-breaking spaces to the spacebar. Because these whitespace characters are mostly invisible and may be accidentally typed by mistake, this layout is not the default version and may not be very suitable for programming. This is for users who prefer the real spaces for punctuation marks in proper French typography.
✽ Same as Type and Type B:
Space → normal space
Shift + Space → normal space
AltGr + B → NBSP
AltGr +3# + T → Thin space (U+2009)
AltGr +3# + F → NNBSP (U+202F)
✽ Added changes to the spacebar:
AltGr + Space → NNBSP (U+202F)
AltGr + Shift + Space → Thin space (U+2009)
Ctrl + Space → Em space (U+2003)
Ctrl + Shift + Space → NBSP (U+00A0) (This shortcut is just like in Microsoft Word)
✽ The NNBSP narrow non-breaking space (U+202F) called espace fine insécable in French is even easier to type in as it’s accessible with AltGr+Space. Because NNBSP might not be supported in many fonts, there is also the NBSP non-breaking space (U+00A0) called espace insécable.
Type T
Similar to US QWERTY+ Type S, this version also breaks the “no-drastic-changes-to-the keyboard” rule. This is the typographic version, and it is the most different of all the layout types compared to the standard US QWERTY layout. Take note that in this layout the apostrophe is curved by default which is different than the straight one required in programming. For users who understand proper typography and smart quotes. The spaces are exactly the same as in Type S.
✽ The curved typographic apostrophe (’) is very easy to type by being the default one on the 1st level. Only recommended when you need to type a long document — like a novel — with curved smart quotes (’ “ ” ‘ ’) without automatic text correction.
✽ Note: if you don’t know what is a curved apostrophe (’) don’t use Type T at all. The straight apostrophe (') is available in the 3rd level at AltGr+’
TO SUMMARIZE…
Type A: grave accent is more important
Type B: backquote/backtick is more important
Type S: non-breaking spaces are more important. Straight apostrophe be default, like in Type A and B.
Type T: typographic version (and non-breaking spaces). Curved apostrophe and smart quotes are more important. Even easier to type whitespace characters such as the often missing narrow non-breaking space (U+202F). Great for writers.
Diagrams are provided in the downloads.
✽ 4. Install both versions. Double-click on “setup.exe” or right-click and select “Run as administrator”. (If you like, you may scan the contents using Windows Defender or Malwarebytes or another antivirus program by right-clicking the download folder.)

✽ 5. If Windows SmartScreen shows up click “More info” then click “Run anyway”. If User Account window shows up click “Yes”.
✽ 6. For each installation there will be a window stating that the installation is successful. Close everything. Sign out of Windows and log in again. (No need to restart your PC.)
✽ 7. Click the language bar on the bottom right of your screen. Sometimes it might not appear and you have to head over to the Settings app → Time & Language → Language.
✽ 6. Click the language bar on the bottom right of your screen.

✽ 8. Here the default input method is the standard US keyboard and because it’s on top it’s the default one selected each time you log into Windows. You can always switch to the US US QWERTY+ by selecting it, but to make it the default, you need to move it to the top row.
If you have more than one input method and more than one language installed, they can get quite cluttered and need to be sorted out. Note that the language selected has nothing to do with the keyboard layout/input method. You can have the primary language st as English (United Kingdom) with a US keyboard layout.
Click “Language preferences”.

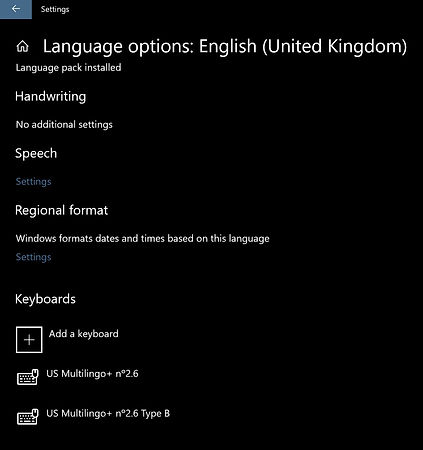
✽ 9. Click the primary language and then the “Options” button.

✽ 10. Click “+ Add a keyboard”. Scroll and search the list for the latest version of the US QWERTY+ keyboard layout (higher number=latest version).

✽ 11. The input you selected first will be the primary. You can rearrange the input methods by clicking “Remove” and selecting the layout again. You can remove the original US
QWERTY layout or leave it; up to you.

✽ 12. If you have more than one input method, an unwanted feature gets activated in Windows. Certain keystrokes can activate shortcuts for a input method, and your keyboard can suddenly change to a different layout. Can be disastrous during a gaming session especially if you have both a QWERTY and a non-QWERTY input methods selected.
The next steps will show you how to disable the input method shortcut.
Go back to the main language preferences settings page. Click “Spelling, typing, and keyboard settings” on the top right.

✽ 13. In the Typing preferences page, scroll all the way down and click “Advanced keyboard settings”.

✽ 14. Checking and unchecking “Let me set a different input method for each app window” can sometimes fix the missing Language bar issue in Windows 10. (This is a bug in Windows 10 and has nothing to do with the custom keyboard layout. If this doesn’t work, sign out from Windows and sign in again.)
Make sure to leave “Let me set a different input method for each app window” unchecked.
Click “Language bar options”, then in the new window that opens, click “Advanced Key Settings”.

✽ 15. If the key sequences are all set to (None) or you prefer not to change anything you can close this window and end the tutorial. If not, select each of the input languages and make sure no key sequence is assigned. Leave “Enable Key Sequence” unchecked. Click “OK” in both windows.
I don’t understand the need for key sequences when you can simply use Win+Space then easily cycle between input methods.
(Hold down the Windows key on your keyboard, press the spacebar multiple times until the desired input method is selected, then let go of the Windows key.)


Done!